

- Tutorials
- Getting edgeEngine Up and Running on Raspberry Pi
Getting edgeEngine Up and Running on Raspberry Pi
Objective
The objective of this tutorial is to demonstrate how to get a Raspberry Pi device up and running with the Raspian operating system and then install and run the edgeEngine Runtime on that device.
Intended Readers
The intended reader of this document is a person with programming or system administration skills that want to learn how to install and use the edgeEngine Runtime on a Raspberry Pi device.
To be full benefit from reading this tutorial, it's useful to have a basic understanding of:
- the edgeEngine Runtime. For a review of the details go here.
- Developer Tokens and Access Tokens. For a review of the details go here.
- working with the Linux operating system from the command line within a terminal window.
What You'll Be Doing
In this tutorial, you'll be doing 4 things. They are as follows:
- You'll set up a Raspberry Pi computer running the Raspian operating system.
- You'll be shown how to connect the Raspberry Pi to a wireless network.
- You'll enable SSH on the Raspian system and then discover the IP address of the machine.
- You'll get the edgeEngine Runtime up and running on the Raspberry Pi device
Technical Prerequisites
In order to get full benefit for this tutorial, you'll need the following:
- A Raspberry Pi computer
- Access to the internet
Setting up the Raspberry Pi machine
This project requires that a Raspberry Pi device to be up and running under the Raspian Desktop operating system. The easiest way to do this is to use the Raspberry Pi Imager program.
This 45-second video shows you how to create an image on a microSD card that you'll insert into the given Raspberry Pi device.
Once the MicroSD card is inserted into the Raspberry Pi device, and the machine is turned on, you'll be taken through the final setup process to get Raspian up and running on the device.
| What is the default username on a new Raspian installation? |
|---|
The default username on a new Raspian installation is pi. |
When setting up Raspberry Pi Desktop for the first time, you'll be prompted to change the login password, when you change the password.
Enabling Wi-Fi
When you setup up Raspberry Pi Desktop for the first time, you will be prompted to connect to your Wi-Fi network. The Wi-Fi setup dialog is shown below in Figure 1.
 |
|---|
| Figure 1: The Wi-Fi configuration dialog in Raspian Desktop setup |
The article found here describes the Wi-Fi setup process. You find wife configuration instructions in the section of the article titled, Configure Wi-Fi on Raspbian Desktop.
Ensuring SSH is enabled
There are two ways to install the mDebug Web utility on the Raspberry Pi device. One way is to install it from within a terminal window on the Raspberry Pi device itself. The other way is to access the Raspberry Pi device from an external machine using SSH. If you want to use an external machine to install the mDebug web utility, you need to enable ssh on the given Raspberry Pi device. Then enable SSH on the Raspberry Pi device do the following:
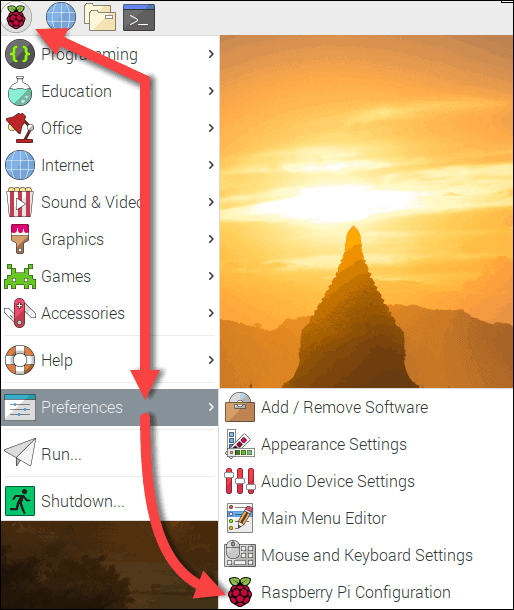
Step 1: Click the Raspberry icon in the upper left of the Raspian Desktop UI as shown in Figure 2 below:
 |
|---|
| Figure 2: Accessing the Raspberry Pi Configuration dialog from the Raspian Desktop |
Step 2: Select Raspberry Pi Configuration from the Preferences sub-menu as shown n Figure 2 above.
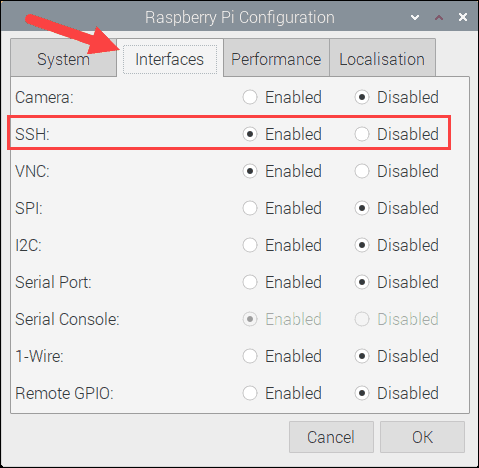
Step 3: Select the option, SSH from the Interfaces tab of the Raspberry Pi Configuration dialog as shown in Figure 3 below.
 |
|---|
| Figure 3: Enabling SSH from the Raspian Desktop Raspberry Pi Configuration dialog |
Discovering the IP address of the machine
Once Wi-Fi is turned on and SSH is configured, you need to discover the IP address of the machine. To discover the IP address of a given Raspberry Pi machine, take the following steps:
Step 1: Open a terminal window by clicking the terminal icon, which is the fourth icon to the right in the top menu bar of the Raspberry Pi Desktop UI, as shown above in Figure 1.
Step 2: Type the following command into the terminal:
ifconfig
This will give you the IP address of the current machine. You'll get output similar to the following.
1: eth0: flags=4099<UP,BROADCAST,MULTICAST> mtu 15002: ether e4:5f:01:09:7c:4d txqueuelen 1000 (Ethernet)3: RX packets 0 bytes 0 (0.0 B)4: RX errors 0 dropped 0 overruns 0 frame 05: TX packets 0 bytes 0 (0.0 B)6: TX errors 0 dropped 0 overruns 0 carrier 0 collisions 07:8: lo: flags=73<UP,LOOPBACK,RUNNING> mtu 655369: inet 127.0.0.1 netmask 255.0.0.010: inet6 ::1 prefixlen 128 scopeid 0x10<host>11: loop txqueuelen 1000 (Local Loopback)12: RX packets 42829 bytes 18852669 (17.9 MiB)13: RX errors 0 dropped 0 overruns 0 frame 014: TX packets 42829 bytes 18852669 (17.9 MiB)15: TX errors 0 dropped 0 overruns 0 carrier 0 collisions 016:17: wlan0: flags=4163<UP,BROADCAST,RUNNING,MULTICAST> mtu 150018: inet 192.168.86.41 netmask 255.255.255.0 broadcast 192.168.86.25519: inet6 fe80::95e2:f9cd:4121:f792 prefixlen 64 scopeid 0x20<link>20: ether e4:5f:01:09:7c:4e txqueuelen 1000 (Ethernet)21: RX packets 1262118 bytes 723231100 (689.7 MiB)22: RX errors 0 dropped 0 overruns 0 frame 023: TX packets 799493 bytes 177223986 (169.0 MiB)24: TX errors 0 dropped 0 overruns 0 carrier 0 collisions 0
Notice in the example above at Line 18 that the IP address for the machine is 192.168.86.41 under the wlan0 section staring at Line 17. wlan0 indicates that the IP address is bound to the wireless network. Your IP address will be different.
If you do not see an IP address, run the following command to request an IP address from your wireless router:
dhclient -v
Then, run ifconfig again.
SAVE THE IP ADDRESS! YOU'LL NEED IT LATER WHEN YOU CONFIGURE THE hosts file.
Giving the machine a unique name
The default installation process of Raspian gives every machine the same name. This can be a difficulty when working with many machines in a cluster of Raspberry Pi computers, particularly when debugging many machines at once via SSH. To make things easier, it's useful to give each machine in the cluster a unique name.
To give a machine a unique name, take the following steps:
Step 1: Go to a terminal window from within the Raspian Desktop UI,
Step 2: Execute the following command:
sudo vi /etc/hostname
The file, /etc/hostname will have the current name of the machine.
Step 3: Strike the i key to put the vi editor into edit mode.
Step 4: Change the content of /etc/hostname to a unique machine name using a name of your choice. For example:
mypi-01
Step 5: Strike the Esc key to take the vi editor out of edit mode.
Step 6: Strike the : key get vi to accept the exit commands to come
Step 7: Strike the wq keys to save the changes and exit vi.
You are now ready to restart the machine
Step 8: To restart the machine, type the following in the terminal window:
sudo reboot
Testing the SSH connection
You'll test the SSH connection of the Raspberry Pi device you've just configured from another machine on the network. To test the SSH connection, take the following steps:
Step 1: Go to a terminal in another machine on your network from which you can execute the ssh command.
Step 2: Type the following command in the terminal window of the second machine:
ssh <pi@PI_MACHINE_IP_ADDRESS>
WHERE
pi is the default user name of the Raspberry Pi machine you've just configured
<PI_MACHINE_IP_ADDRESS> is the IP address of the Raspberry Pi machine.
DO NOT TYPE THE SYMBOLS: < or >
In this case, the command you'll use to access the Raspberry Pi device above with the IP address 192.168.86.41 will be:
ssh pi@192.168.86.41
Step 3: Since this will be your first login to the Raspberry Pi via ssh you'll be asked the following.
The authenticity of host '192.168.86.XX (192.168.86.XX)' can't be established.ECDSA key fingerprint is SHA256:0syuqfaKHQWgllXeZR1hd2skhJaKE5m7qay2x6Mk9KM.Are you sure you want to continue connecting (yes/no/[fingerprint])?
Answer yes.
Step 4: You'll be prompted to provide the password for the user pi. Enter the password.
pi@192.168.86.41's password:
BE ADVISED: You need to change the password for the user pi when setting up the Raspian Desktop. Make sure you use that password.
If all is good, you'll get a response to the login somewhat similar to the following:
Linux mypi-01 5.10.17-v7l+ #1414 SMP Fri Apr 30 13:20:47 BST 2021 armv7lThe programs included with the Debian GNU/Linux system are free software;the exact distribution terms for each program are described in theindividual files in /usr/share/doc/*/copyright.Debian GNU/Linux comes with ABSOLUTELY NO WARRANTY, to the extentpermitted by applicable law.Last login: Wed Jun 2 17:13:55 2021 from 192.168.86.XX
You have successfully established an ssh connection to the machine you provisioned.
Installing the mimik-edge-cli tool and the edgeEngine Runtime
To install and run the edgeEngine Runtime on the Raspberry Pi device, follow the tutorial, Installing edgeEngine and the mimik-edge-cli Tool on a Linux System or MacOS, but BEWARE by reading the advisory that follows.
| IMPORTANT: Make sure you download the Raspian version of the edgeEngine Runtime |
|---|
| The tutorial described above that shows you how to install and run edgeEngine Runtime is intended for general Linux installation. The version of the edgeEngine Runtime you need for Raspberry Pi devices is special. Thus, you need to make sure you are installing and running the Raspberry Pi/Raspian version of the edgeEngine Runtime. The most recent version of the edgeEngine Runtime for Raspberry Pi/Raspian can be found at https://github.com/edgeEngine/egdeengine-raspbian/releases. |
Installing Node.js
After you get the Raspian up and running in the Raspberry Pi Device, you need to install Node.js. Node.js is critical for running the edgeEngine Runtime and the mimik-edge-cli tool. The mimik-edge-cli tool is used to deploy and run edge microservice on a device that's running the edgeEngine Runtime.
To install Node.js on the Raspberry Pi device, take te3h following steps.
Step 1: execute the following command in a Raspberry Pi terminal window to configure the location of the Node.js deployment package on the Raspberry Pi device.
curl -sLf -o /dev/null 'https://deb.nodesource.com/node_14.x/dists/buster/Release'
Step 2: execute the following command in a Raspberry Pi terminal window to install Node.js:
sudo apt-get install -y nodejs
You'll see a lot of activity in the terminal window during the installation process.
Step 3: Once installation has been completed, execute the following command in the terminal window to verify that Node.js has been property installed:
node --version
You'll get output similar to the following, depending on the latest version of Node.js:
v14.18.1
Step 4: Execute the following command in the terminal window to verify that the NPM package manager has been properly installed as part of the Nod.js installation:
npm --version
You'll get output similar to the following, depending on the latest version of NPM:
6.14.15
Opening Port 8083
By default, edge microservices listen to the default port 8083 to process incoming requests. Thus, that port needs to be open to outside access on the Raspberry Pi device. You can open ports on a Raspberry device using a program named Uncomplicated Firewall, ufw. This program does not ship with the default installation of Raspberry Pi. It needs be installed. Take the following steps to install ufw on the Raspberry Pi device and open port 8083.
Step 1: Execute the following task in a terminal window to update the Raspberry Pi packages environment:
sudo apt update
Be advised you will be asked for the administrator's password for the Raspberry Pi Device.
Step 2: Execute the following task in a terminal window to install ufw
sudo apt install ufw
Step 2: Execute the following task in a terminal window to verify the installation of ufw
sudo ufw --version
You'll get output similar to the following, depending on the latest version of ufw:
ufw 0.36Copyright 2008-2015 Canonical Ltd.
Step 3: To open port 8083 on the Raspberry Pi device, execute the following command in a terminal window:
sudo ufw allow 8083
You'll get the following output:
Rules updatedRules updated (v6)
The Raspberry Pi device is now ready for the installation and use of the edgeEngine Runtime and the mimik-edge-cli tool. The following section describes how to install the edgeEngine Runtime and the mimik-edge-cli tool on the Raspberry Pi device.
Installing the edgeEngine Runtime and mimik-edge-cli tool.
To learn how to install the edgeEngine Runtime and the mimik-edge-cli tool follow the tutorial, Installing edgeEngine and the mimik-edge-cli Tool on a Linux System or MacOS.
Once the edgeEngine Runtime and the mimik-edge-cli tool are installed, you need to configure an Access Token to the edgeRuntime in order for the Raspberry Pi device to work with edge microservices. The following section describes the process.
Configuring the edgeEngine Runtime with an Access Token
To learn how to configure the edgeEngine Runtime with an Access Token, follow the tutorial, Using the mimik-edge-cli Tool to Get An Access Token.
Congratulations! You've gotten a Raspberry Pi device up and running with the edgeEngine Runtime.
Review
In this section, you learned:
- How to install the Raspian operating system on a Raspberry Pi device
- How to install Node.js on a Raspberry Pi device
- How to open port
8083on the Raspberry Pi device usingufw - How to install the edgeEngine Runtime and
mimik-edge-clitool on the Raspberry Pi device - How to get an Access Token and associate it to the edgeEngine Runtime